Recently, I needed to make a pixel-art flower sprite gradually fill with color from the exact center outward. I wanted it to respond to scene lights (meaning it had to be a Lit material) and expand outward linearly. It took some trial and error, a few broken graphs, and some flipped math nodes, but I finally got it working perfectly. If you're trying to figure out how to do a crisp, pixel-snapped radial fill for your own 2D games, here is exactly how I built it—including the mistakes I made along the way and how I fixed them.
Phase 1: The Pure Mathematical Approach (Radial UVs)
Our starting point is figuring out how to tell the shader to look
at the center of our texture and grow outward in a circle. By
default, Unreal's TextureCoordinate node reads from
the top-left corner (0,0) to the bottom-right corner (1,1).To fix
this, we have to offset the origin to the center: (0.5, 0.5).
The Node Setup
First, I set my material to Surface, Masked, and Default Lit. Then, I mapped out the core distance math:
Multiply that length by 1.414. Why 1.414? Because the distance from the center to the exact corners of a square texture is roughly sqrt{0.5^2 + 0.5^2} approx 0.707. Multiplying it by 1.414 scales our gradient perfectly so a progress value of 1.0 clears the extreme corners of the image.
-
Grab a
TextureCoordinate[0]node and Subtract aConstant2Vectorset to (0.5, 0.5). This shifts our center point. -
Run that subtraction intoa
Lengthnode. TheLengthnode calculates exactly how far away every single pixel is from that center point - Multiply that length by 1.414. Why 1.414? Because the distance from the center to the exact corners of a square texture is roughly sqrt{0.5^2 + 0.5^2} approx 0.707. Multiplying it by 1.414 scales our gradient perfectly so a progress value of 1.0 clears the extreme corners of the image.
To animate it, I set up a loop using Time ->
Multiply (for speed control) -> Frac (to
create a looping 0.0 to 1.0 sawtooth wave). I hooked that time
loop into Input A of a second Subtract node, and my
distance math into Input B. Finally, passing it through a
Step node gave me a hard on/off mask.
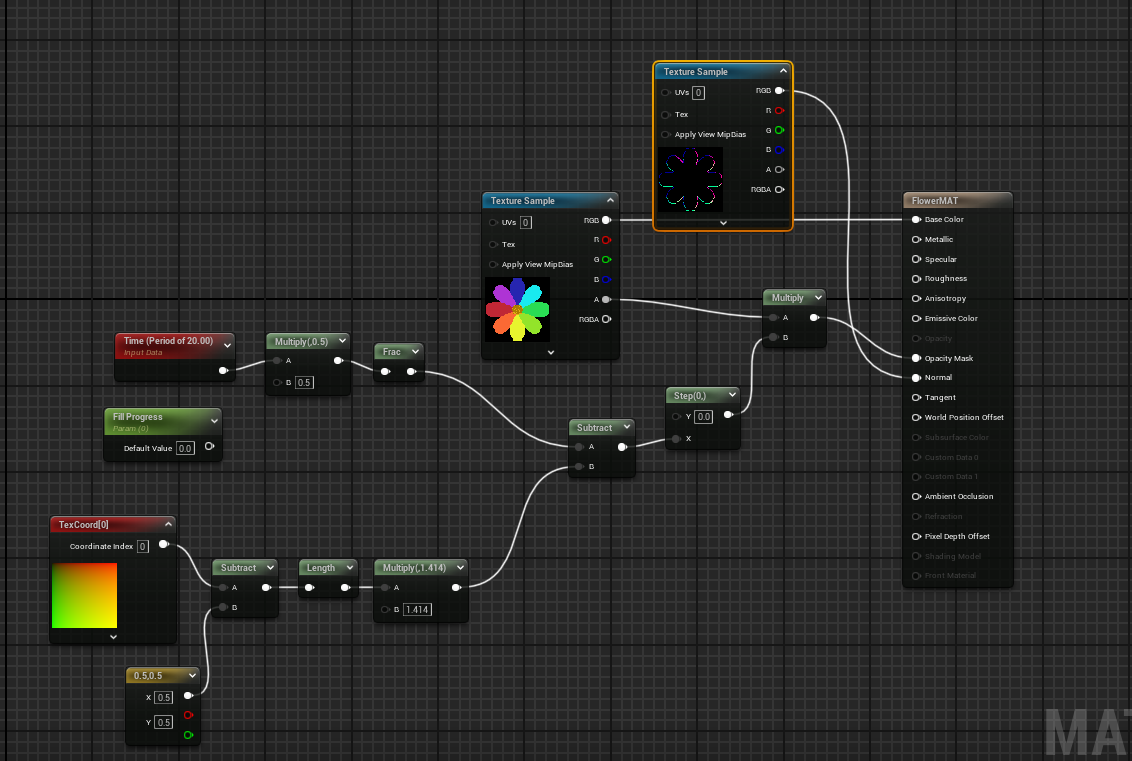 Figure 1: Node Graph for Radial Fill.
The Problem
When I plugged this into the Opacity Mask and hit
preview, it technically worked... but it looked wrong for my game.
Because the math is a perfect circle, the fill swept across the
screen like a smooth vector graphic. It didn't care about the
blocky, jagged edges of my pixel-art petals at all. It looked like
an artificial circle overlaying a sprite rather than the flower
itself actually blooming.
Phase 2 (Snapping to the Texture's Alpha)
To make the fill actually dictate the shape of the flower, we need to force our mathematical circle to play by the rules of our sprite's pixel silhouette. The secret weapon here? The texture's own Alpha (A) channel.
Tweaking the Logic for Shape
Instead of passing our perfect circular distance straight into the
final subtraction, we intercept it. By multiplying our
Length math by the Alpha channel of our
Texture Sample, we essentially mask out the gradient.
Because pixel art has hard transparent thresholds, multiplying by
the alpha instantly forces the distance calculation to flatten out
and conform to the steps of the actual petals.
Going Full Pixel-by-Pixel (Quantization)
To take it a step further and ensure it fills exactly one pixel row at a time rather than sweeping fluidly across texels, I added a quantization block based on my flower's actual canvas dimensions (87 x 87 pixels):
- Take the distance masked by the alpha.
- Multiply it by 87.0.
- Run it through a Floor node (which drops all decimals, locking the values into flat, integer-based pixel bands).
- Divide it back by 87.0 to return it to a clean 0.0 to 1.0 range.
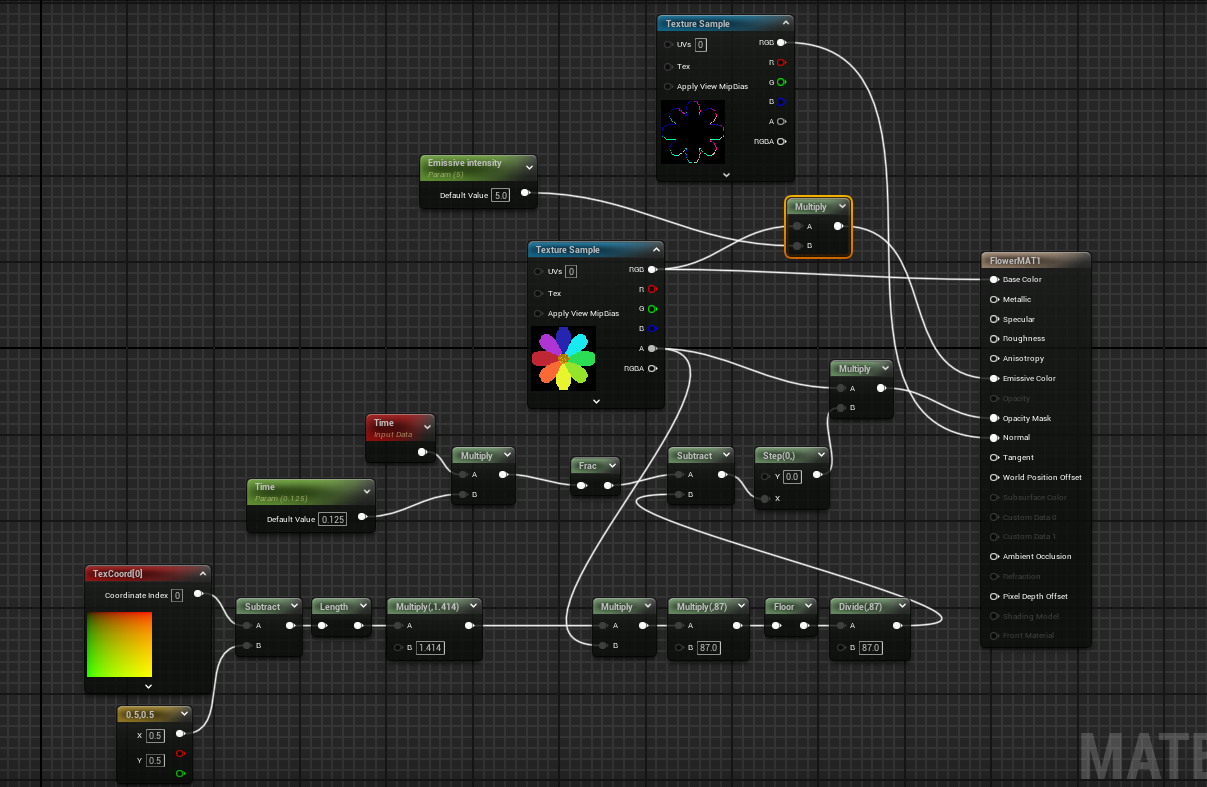 Figure 2: Node graph for Alpha Radial.
Final Result
Now, when the time loop updates, the smooth circle is completely gone. The animation aggressively snaps along the texel rows of my 87 x 87 sprite canvas, making it look like the pixel art itself is organically illuminating outward from the core!